 When I started making jewelry back in August I wasn't sure how I would sell it. I have been successful with selling at in home parties. But, it is always more enticing when you can see, feel, and put on one of my pieces. It was great at first, but I quickly learned that I needed other outlets. So I joined the legions of passionately crafty people selling their wares on Etsy(dot)com.
Etsy is an outstanding site devoted to artists and the handmade items that they produce(if you haven't already become a fan you should check it out). Artists form, maintain, and stock their own Etsy shops. At first I thought, "Oh this will be easy", and in some ways it is. The ease of use is wonderful. Choose a shop name, upload some pictures of your items, write a clever little description, and WHAM you make money! Right? Well not quite. The competition is stiff. By searching the word "jewelry" I got 20,105 hits.
So how the heck am I going to get noticed amongst a sea of jewelry makers? I am in search of the answer to that question. There are plenty of people in the community ready to offer good advice on how to create a successful Etsy shop, and I am ready to take it! I am going to start with the part I feel is the most important. Product photography.
As I mentioned before, I get the response I am looking for when people see my work in person. Online, however, I am only able to engage my customers through the product descriptions and the PHOTOS! They say a picture is worth a thousand words. Well I hope so because writing witty descriptions of my items is not my strong suit. Photos, lets focus on photos!
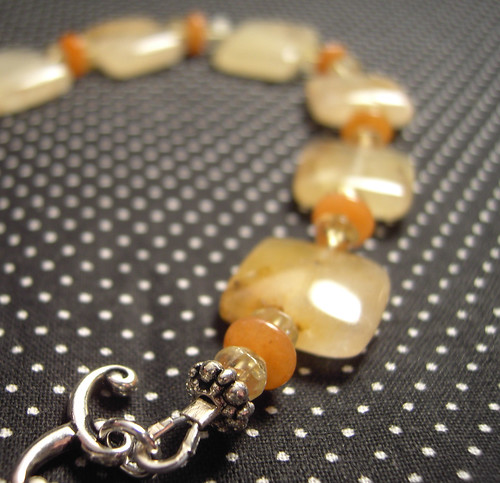
I took an awesome little class offered by a fellow EtsyRain (subject for another day) member who taught me three very important lessons. First, when taking pictures of smaller items like jewelry I need to use the Macro setting on my camera This really helped get better detail of my jewelry. Second, she helped me find the "white balance" feature. Funny I didn't even know my camera had that option? Setting the white balance is so key to getting colors in photographs to look true to what you see in real life. The third nugget of information I took away that day was how to use the focus. My camera automatically focuses on what you point it at. But what my tutor taught me was how to focus on one small part of the whole and adjust the focus so the rest of the field drifted off. This is hard for me to explain in words, but hopefully my photo above will illustrate my point.
I went back home that day prepared to reinvent my shop and hopefully make it stand out through my product photos. I have received a few orders as a result, but I'm not done yet. I know I can make it even better. So this weekend I built myself a light box. It's not nearly as complicated as it sounds. I have seen may blogs on this subject including where and what supplies to buy. Well one blog in particular peaked my interest (I can't remember which one at the moment. Darn, I will rack my brain.). Well here it is. My new light box. Hopefully this will be a positive next step in my quest to achieve Etsy greatness. Well, at least a sale or two.


4 comments:
Meghan, I love your light box! So much easier than mine. Foam board, blades, tape, tissue paper, piece it together. Oh crap, where am I going to keep this monster now!
I might be going the way of the box.
Great first blog. Looking forward to more!
Let me be the first of many to welcome you to the blogging world!
Awesome first post! Great job on your photos...so glad my workshop helped ya! Love your lightbox too...looks quick and easy to set up when you need it! :) Yay Meghan!
Your Photos are awsome. I'm so proud of you. And thanks listing me on your pottery favorites.
Post a Comment